|
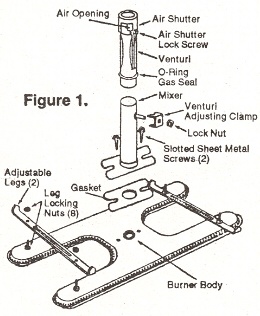
1. Leg Height Adjustment (See figure 1.)
Stainless Steel Replacement Burners Only
A. Remove old burner from grill, and measure the leg height (from the bottom of the leg to the top of the burner).
B. With the new burner resting upside down on a flat surface, thread one leg locking nut onto each threaded post.
C. Slip legs onto threaded posts and adjust nuts until the leg height is the same as that of the old burner.
D. Thread a second nut onto each threaded post and tighten.
2. Venturi Installatlon (See figure 1.)
Place the burner upside down. Position the gasket(s) over the hole(s) in the burner. Fasten the venturi(s) to the
burner with sheet metal screws, provided. Do not over tighten.
3. Venturi Adjustment (See figure 1.)
NOTE: If your venturis are of the straight fixed, or fixed up-front type, they require no adjustment. You may proceed to step 4.
NOTE: Venturis 710, 725, 727, 758, and 759, used with Arkla,
Charmglow, and Structo, pivot on their
mounting plates to accommodate valves with wider orifice centers.
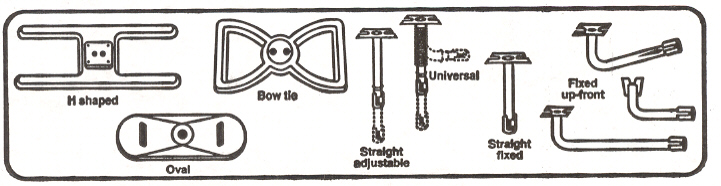
Straight Adjustable Venturl(s)
A. Slightly loosen the adjusting clamp lock nut, and extend venturi(s) to maximum length. Caution: Take
care not to remove the telescoping portion of the venturis from the fixed portion. If the telescoping portion or adjusting clamps are
accidently removed, be sure that the 0-ring seals are properly
seated when the venturis are reassembled.
B. To allow the venturi(s) to telescope to the correct length, place the assembled burner and
venturi(s) in the grill so that the burner legs are correctly seated and venturi air shutter(s) seat(s) correctly over the gas valve orifice.
(See figure 2 for correct air shutter seating.) Adjust venturi length(s) as necessary.
C. Remove the burner, and tighten the adjusting clamp(s) to fix the venturi(s) at the Correct length. Do not overtighten.
|
|
Universal Venturl(s)
NOTE: The following instructions assume that your grill has up-front controls and curved venturis.
Universal venturis may also be used with post control models with straight venturi(s). If your grill is of this type, it will not be
necessary for you to bend the flexible tube as described in step A.
A. Place the old burner next to the new one. Carefully bend the flexible portion of the venturi tube(s)
to match the curvature of the old venturi(s). Do not compress or stretch the flexible tube.
B. Adjust the length of the new venturi(s) to match that of the old one(s). Telescoping portions of
universal venturis slide freely to adjust and remain securely in the adjusted position.
NOTE: Some universal venturis have set screw or clamp adjustment. For these venturis, slightly loosen the
screw or clamp to adjust length and retighten to fix new length. Do not overtighten.
C. Place the assembled burner and venturl(s) In the grill so that the burner legs and air shutter(s) are
correctly seated. (See figure 2 for correct air shutter seating.) Adjust venturi length(s) as necessary.
4. Air Shutter Adjustment
Venturis are normally shipped with air shutters In a in a half open position, which provides the desired blue
flame in most cases. Check shutter before installing assembled burner. Air shutters may be adjusted later if necessary.
See "What
should the burner flame look like" for more information.
5. Bumer-Venturl Assembly Installation
A. Place the assembled burner and venturl(s) in the grill so that the burner legs are correctly seated and
venturi air shutter(s) seat(s) correctly over the gas valve orifice.
B. IMPORTANT: Visually confirm correct air shutter seating. (See figure 2) Incorrectfy seated
venturi(s) may cause post or control panel fire. Air shutter(s) and gas valve orifice(s) in post control grills may usually be viewed by
removing a panel in the post. On most up-front control grills, they may be seen by looking up from below the control panel. For added security
on up-front control grills, a piece of steel wire may be used to fasten the venturi air shutter to the gas valve.
C. Replace venturi clips if your grill is equipped with them.
D. Light grill to test burner operation.
|